The problems of IPv4 are known as shortages of addresses, the limitation of the Internet growth hinders the use of new users, in addition to the fact that Today routing is inefficient and another big problem among many more than users use NAT.
In this regard we will explain how to apply basic IPv6 configurations (which is the successor of IPv4) in the operating systems of both Linux and Windows respectively, we are going to use a virtual machine with Linux and Windows we do not recommend making the changes directly until we try them before in a virtual machine so we do not harm anything before.
1.- Configuration for the Linux operating system:
There are many ways to configure IPv6 and tunnels. Some of them are:
• ifup / ifdown - A new method of configuring interfaces on Debian machines.
• iproute - Use the ip command.
• ifconfig / route - The original network configuration tools.
It is advisable to use ifup / ifdown. Good hands to the console and let's start!
1.1- Enable / Disable IPv6:
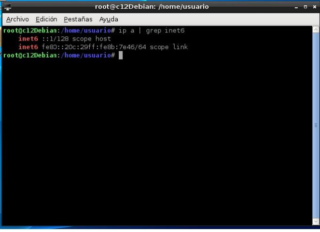
Linux has support for IPv6, to verify it the terminal is opened and the following command that gives us the IPv6 address is executed:
1.2- Disable IPv6:
In these practices it is best to do them as a Root user motivated to make configurations that need this permission, if we wish to de-enable IPv6 support:
- The file /etc/modprobe.d/aliases should be opened with any text editor or with the nano command.
gksudo gedit /etc/modprobe.d/aliases-In the file after the line "alias net-pf-11 rose" the following text is inserted:
# Desabilitado de IPv6
alias net-pf-10 ipv6 off
alias net-pf-10 off
alias ipv6 off
# Fin del deshabilitado de IPv6
-The file is saved and the computer is restarted.
1.2.1- Interfaces Configuration:
A new interface is added to the / etc / network / interfaces file:
iface eth0 inet6 static
address 3ffe:1234:0005:0006::78
netmask 64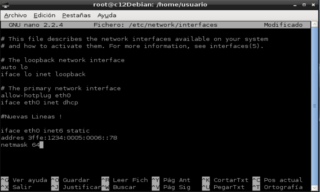
- After saving the file, the following command is executed, which executes the file after configuring IPv4:
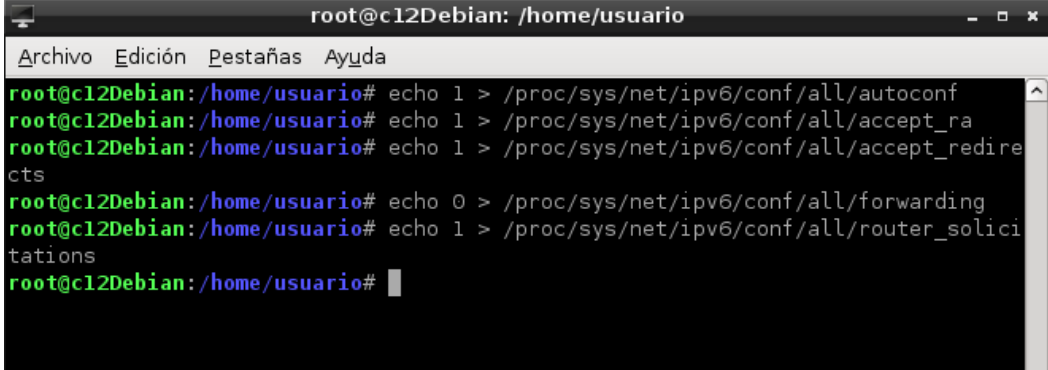
update-rc.d network-ipv6 start 40 S-To allow the machine to configure itself, the corresponding parameters of the kernel must be set appropriately in the following order:
echo 1 > /proc/sys/net/ipv6/conf/all/autoconf
echo 1 > /proc/sys/net/ipv6/conf/all/accept_ra
echo 1 > /proc/sys/net/ipv6/conf/all/accept_redirects
echo 0 > /proc/sys/net/ipv6/conf/all/forwarding
echo 1 > /proc/sys/net/ipv6/conf/all/router_solicitations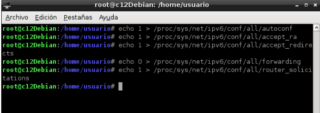
-An IPv6 address can be added with the ifconfig command specifying the interface example eth0:
ifconfig eth0 add 3ffe:1234:0005:0006::78/64To remove:
/sbin/ifconfig eth0 inet6 del 3ffe:ffff:0:10:2a01::2/64 1.3.- Local routing tables:
IPv6 hosts use a routing table to maintain information about other IPv6 networks and hosts. The network segments are identified by an IPv6 network prefix and a prefix length. In addition, the routing tables provide important information to each local host regarding how they should communicate with remote hosts and networks.
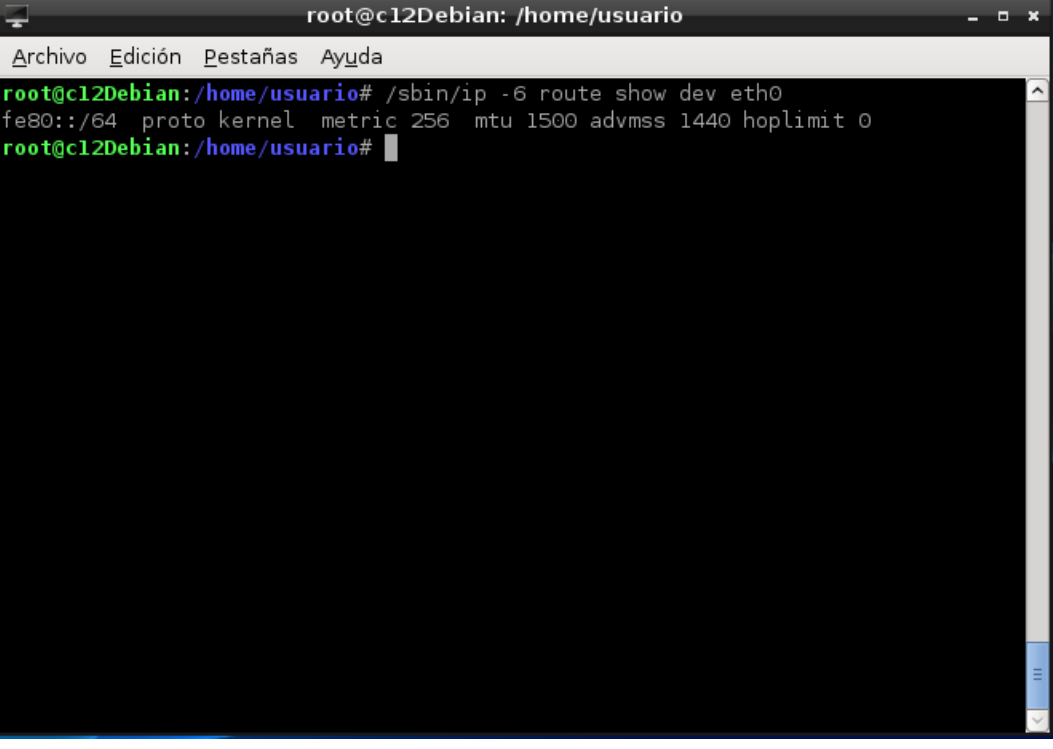
-To show IPv6 Routes: a way to show in with the use of the ip command you can change the interface in this example we use eth0:
/sbin/ip -6 route show dev eth0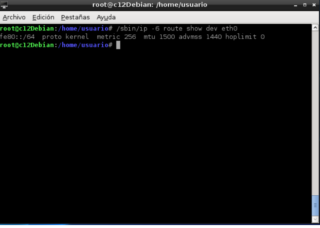
-It can also add IPv6 routes through a Gateway: it can be done by using ip or rute, in the examples you can use the interface eth0 you can use any interface, to add the following command using the ip command:
/sbin/ip -6 route add 2000::/3 via 3ffe:ffff:0:f101::1 dev eth0or using route:
/sbin/route -A inet6 add 2000::/3 gw 3ffe:ffff:0:f101::1 dev eth0-To delete an IPv6 route through a Gateway also by ip or route:
/sbin/ip -6 route del <ipv6network>/<prefixlength> via <ipv6address>
[dev <device>]
#> /sbin/route -A inet6 del <ipv6network>/<prefixlength> gw <ipv6address>
[dev <device>]
-Add an IPv6 route through an interface: It can be done by using ip or route:
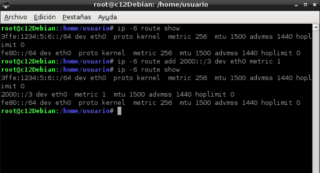
/sbin/ip -6 route add 2000::/3 dev eth0 metric 1
/sbin/route -A inet6 add 2000::/3 dev eth0
-Eliminate an IPv6 route through an interface: It can be done through the use of ip or route:
/sbin/ip -6 route del 2000::/3 dev eth0 metric 1
/sbin/route -A inet6 del 2000::/3 dev eth0
You can verify the last exposed with the following image:
1.4.- Neighbor cache:
To know the neighbor table that a machine is aware of, the following command must be executed in the console:
ip –6 neighIn this table you can see the physical level address of the neighbors you know. To check how this data is obtained, traffic can be captured and a ping6 can be made to a machine that is not in that table, analyzing the captured packets that are involved in the Neighbor Discovery procedure.
2.- Configuration for the Windows operating system:
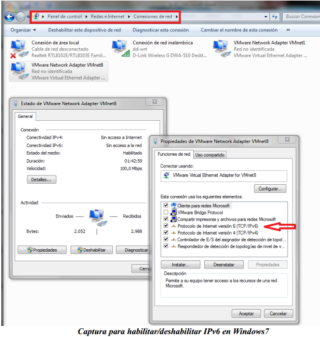
2.1.- Enable / Disable IPv6:
In Windows we have two alternatives to perform this process. One that can be done using the graphical interface and another made through the command line.
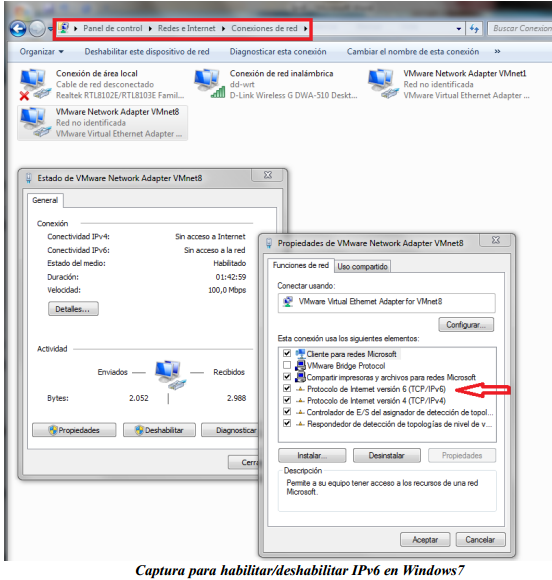
Steps to follow using the Vista / Windows 7 / Server graphical interface:
- Go to Start -> Control Panel
- We select Networks and Internet
- Then we selected Center for Networks and Shared Resources
- Then select the option Change the adapter configuration from the menu on the left
- Then we select the Network Connection that we want to configure, by double clicking on it.
- In the new window that opens, click on the Properties button
- Finally we uncheck / mark the option Internet Protocol version 6
- (TCP / IPv6) and accept in all open windows.
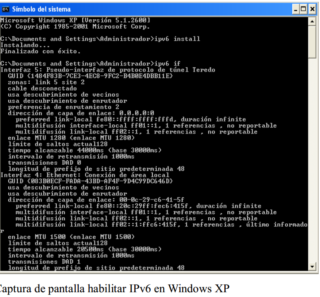
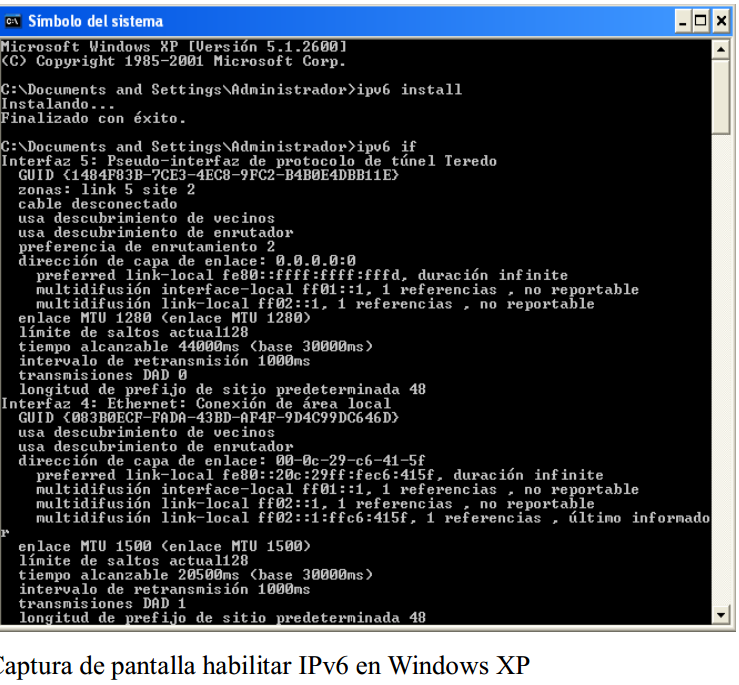
To enable IPv6 in Windows XP the easiest way is from the command prompt:
- Start-> Run-> cmd then press enter
- It runs ipv6 install
- To verify if ipv6 if installed correctly
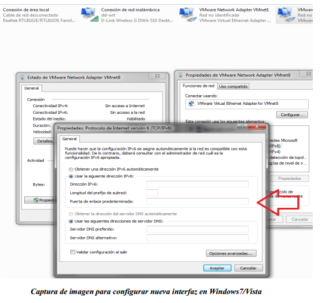
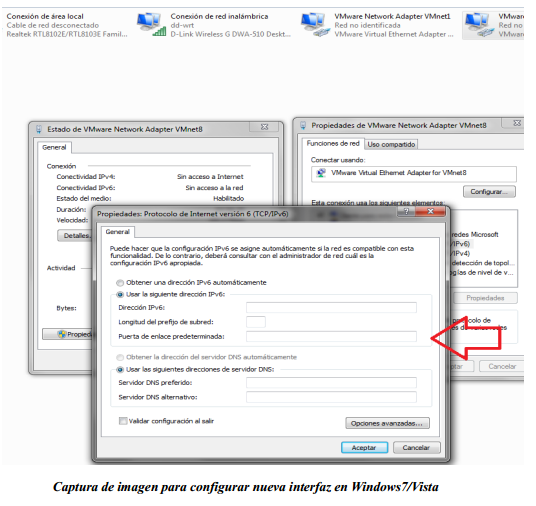
2.2- Interface Configuration:
It can be configured by the command prompt or the Windows graphic interface in Windows7 / Vista follow the following steps:
- Go to Start -> Control Panel
- Select Networks and Internet
- Then we select Properties
- Then select the option Change the adapter configuration from the menu on the left
- Then we select the Network Connection that we want to configure, by double clicking on it.
- In the new window that opens, click on the Properties button
- Finally we mark the option Internet Protocol version 6 (TCP / IPv6) and click on the Properties button.
- Then a new window opens in which we must enter valid values for the fields:
- o IPv6 address
- o Length of the subnet prefix o Default gateway.
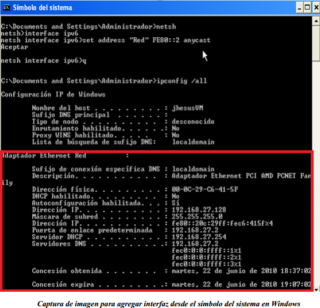
-For the Symbol of the System:
- Press the Windows + R key to open the Execute dialog box.
- We write cmd, followed by Enter to open a DOS window.
- Type ipv6 interface, and then press Enter.
- With the following command: We use the command set address [[interface =] string]
- [address =] addressIPv6 [[type =] {unicast | anycast}] [[validlifetime =] {integer | infinite}] [[preferredlifetime =] {integer | infinite}] [[store =] {active | persistent}]
- To exemplify, the following command is executed:
- o An example of use could be: set address "Private" FE80 :: 2 anycast
2.3.-Local routing tables:
To see the routing table follow the following steps:
- Press the Windows + R key to open the Execute dialog box.
- We write cmd, followed by Enter to open a DOS window.
- In the command prompt window, type netsh, and then press ENTER.
- Type interface ipv6, and then press ENTER.
- Type show routes, then press ENTER.
2.4.- Add an IPv6 route:
To add an IPv6 route, follow the steps below.
Press the Windows + R key to open the Execute dialog box
- We write cmd, followed by Enter to open a DOS window. In the window
- from the command prompt, type netsh, and then press ENTER.
- Type interface ipv6, and then press ENTER.
- Type add route [prefix =] ipv6 address / integer [[interface =] string] [[nexthop =] ipv6 address] [[siteprefixlength =] integer] [[metric =] Integer] [[publish =] {no | yes | immortal}] [[validlifetime =] {Integer | infinite}] [[preferredlifetime =] {integer | infinite}] [[store =] {active | persistent}]
-To do otherwise, remove an IPv6 route: the following steps are followed:
- Press the Windows + R key to open the Execute dialog box.
- We write cmd, followed by Enter to open a DOS window.
- In the command prompt window, type netsh, and then press ENTER.
- Type ipv6 interface, and then press ENTER.
- Enter show routes to obtain the route prefix and the index of the interface by which the route prefix addresses can be reached.
- Finally To delete a route, type delete route [prefix =] addressIPv6 / integer [interface =] string
2.5.-Prefixes How to use and consequences:
The IPv6 routing table is generated automatically and is based on the current IPv6 configuration of the equipment. When forwarding IPv6 packets, the computer looks in the routing table for the entry most similar to the destination IPv6 address. The path for the local prefix of the link (FE80 :: / 64) is not displayed.
The default route (a route with a prefix of :: / 0) is typically used to forward an IPv6 packet to a default router on the local link. Because the router that corresponds to the default router contains information about the network prefixes of the other IPv6 subnets of the larger IPv6 network pool, it forwards the packet to other routers until it is finally delivered to the destination. To use the prefix, the following steps are followed:
- Press the Windows + R key to open the Execute dialog box.
- We write cmd, followed by Enter to open a DOS window.
- Type ipv6 interface, and then press Enter.
- We use the set interface command "Name_of_the_Interface" siteprefixlength = 120 (the 120 can be replaced by the prefix size you want to set).
- An example of use could be: set interface "Private" siteprefixlength = 120
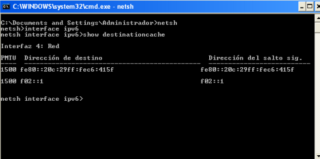
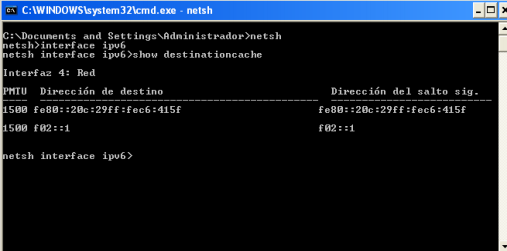
2.6.- Cache of destinations:
They are obtained by using the netsh tool available in Windows Vista / 7 / Server natively, in the case of Windows XP the installation of an additional package must be performed in order to use this tool. The following steps must be followed:
- Press the Windows + R key to open the Execute dialog box.
- We write cmd, followed by Enter to open a DOS window.
- Type ipv6 interface, and then press Enter.
- We use the show destinationcache command.
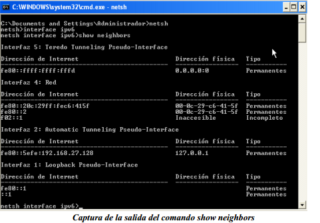
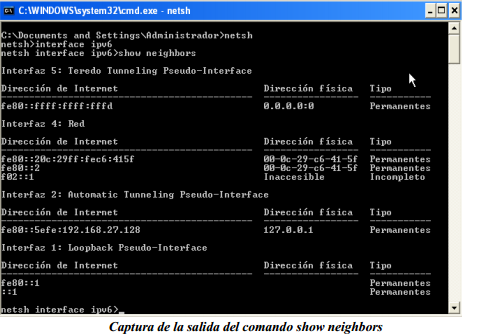
2.6.2-Neighbor Cache:
Like the destination cache, they are obtained by using the netsh tool: the steps to follow are as follows:
- Press the Windows + R key to open the Execute dialog box.
- We write cmd, followed by Enter to open a DOS window.
- Type ipv6 interface, and then press Enter.
- We use the show neighbors command


